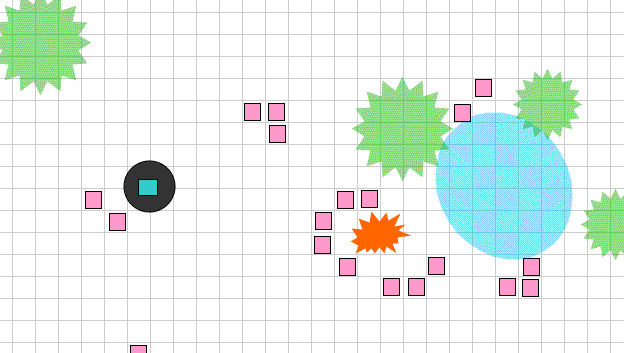
In one of my recent comic strips, Grace, the liontaur hero, drew a map of an enemy camp she had scouted. Here's what the map looks like without the fancy Photoshopping:

Part of the joke, of course, is that it looks like a D&D battle map, complete with a five-foot-per-square grid. But what served for a laugh in my comic can serve you for making usable battle maps for your online games.
There are a ton of dedicated mapping programs out there, plus even more professional-quality drawing and painting programs that can be used to make maps. I've used a few of both over the years, but nowadays I turn to Microsoft Excel, especially for battle maps.
Yeah, yeah, I know -- Microsoft Is Evil. And I certainly would not advocate buying Office for the sake of using Excel for maps. Actually, I would not advocate buying Office for any reason whatsoever. But if you own it, like I do, and if you are comfortable using it, like I have to be for my work, then I have to say that it does handle the job nicely. (Darn you to heck, Bill Gates, for doing a good job and making it harder to hate you!)
So if you're in my boat -- the unfortunate souls forced to use Excel anyway -- then here are a few of my tips for using Excel to make battle maps.
 Now, in a face-to-face game, the base map -- often drawn on a battle mat or other grid -- sets the scene, and minis or chits or dice or pennies stand in for player characters, monsters, and movables. But in an online game, especially a play-by-post game, the battle map is a graphic file, most likely a jpeg or a gif. And as DM, you have to create that file.
I have seen inventive DMs set up a face-to-face style map, with minis and all, then send photographs of it to the players ... which is one way to do it! But if you prefer the digital to the analog, then making the map entirely on your computer has significant advantages. Like your significant other not complaining about the D&D map set up on the kitchen table for days on end! Like your cat not stealing the beholder mini while you're at work!
When playing a battle round every day or two, sending updated maps out regularly is key -- because players need positioning info on their PCs and their foes in order to post accurately. Here's an example of a battle that I ran this way. The page is in reverse chronological order, so scroll to the bottom to read from the beginning. Excel makes a good tool for generating maps like these. Here's how.
Tip 1: Set up your columns and rows in a blank spreadsheet so that you get a grid of squares. Column width 3.00 and row height 22.00 work pretty well. (If you need help with stuff like setting column and row dimensions, then get a book or take a class or something, you Excel noob!) Choose Normal View so that you don't have annoying margins in the way, and choose Fit to 1 page wide by 1 page tall in Page Setup to get rid of distracting page breaks.
Tip 2: Use column and row headings as a coordinate system to let your players name spots on the map. For example, telling your DM, "I'll go to R14, drawing my sword as I do," or "I center the fireball on H5," both have the great advantage of being unambiguous.
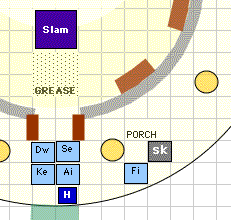
Tip 3: Sometimes I'll use the border palette to make room and hall walls. Here's an example of that. I also sometimes use a black fill for the interstitial solid bits. Borders on cells work well for walls, such as in dungeons or building interiors.
Tip 4: For a map of a natural space, in caverns or out of doors, say, straight lines make little sense. But Excel has some decent drawing tools that you can use to make curves and odd shapes. Turn on the drawing toolbar to get access to them. Use Autoshapes to make many of the features of your map -- like I did in this nice example for the river (a crescent and two boxes), the trees (stars), and other features. Use the Curve, Freeform, and Scribble tools under the Lines pallete to make very irregular shapes.
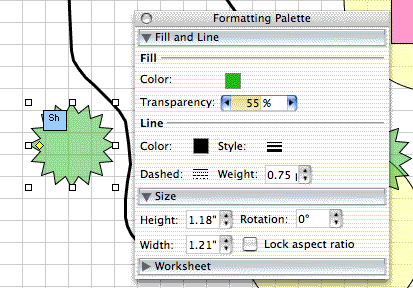
 Tip 5: Use the transparency option to show the grid under objects. In the graphic at right, the transparency of the tree is set to 55 percent.
Tip 6: Use transparent circles and boxes to show spell effects, such as a patch of Grease or an Entangle spell. That's also good for showing light levels -- cover parts of the map with low transparency grey boxes to show areas of darkness, for example, or high transparency yellow circles to show bright spots.
Tip 7: Use square boxes for creatures on your map. I tend to give each faction or creature type a different color: blue for PCs, green for NPCs, pink for the goblins, orange for the wargs, etc. The nice thing about using boxes is that you can type a couple letters in them. Put the PCs' first initials in each blue box, so everyone knows who is who. You can also use color to show status -- a thick red border on creatures in the negatives, a thick dotted black border on dead creatures, for example. Another sweet thing about using boxes is that they are easy to grab and move around on your map, for easy set up of each round's action. I suppose circles could work too.
Tip 8: Reuse old spreadsheets from battle to battle so you don't have to make a new grid each time. Save common elements, like trees, to use for different encounters. You might want to set up a basic map spreadsheet as a template that you copy for use each time. Note that you can put multple maps in the same Excel file, one per worksheet -- that's a good way to keep all the maps together for a given module, complex, or region.
Tip 9: Use a simple screen grab to take a snapshot of a finished map. If you can, save it as a jpeg or gif before e-mailing it or posting it to the Web -- gif is better because the files tend to be smaller. Make sure your screen grab includes the column and row headings, so your players can refer to squares by name.
Tip 10: Save Often! Make Backups! Yeah, yeah, everyone knows that. But seriously, nothing is as discouraging as a hard disk failure, and your game may well be screwed. Burn a copy of your spreadsheets (and all your other files) onto a CD. E-mail files to your Yahoo or G-Mail accounts, and file them away. You'll thank yourself for it some day.
But you do not have to make your own maps at all -- use mine! Here is an Excel file with four sample maps. Look at all the worksheets, not just the top one. Sample 1 is the map I used in my Web comic, using autoshapes. It has no text because the character who drew it is illiterate. Sample 2 is simpler, without any autoshapes, using just boxes, circles, and shaded cells, and it is well-labeled. Sample 3 shows how to make dungeon walls with cell borders. Sample 4, a battle with higher level characers, is a little more than somewhat nuts, but it does show a larger battlefield and a few advanced tricks.
Enjoy!


 Tip 5: Use the transparency option to show the grid under objects. In the graphic at right, the transparency of the tree is set to 55 percent.